We’re reader-supported. When you buy through links on our site, we may earn an affiliate commission.
My husband has always had a deep passion for fishing; it reminds him of the times he spent with his grandparents. I often need more patience. However, there’s an undeniable magic in those moments when the fish start biting, transforming an ordinary day at the lake into an extraordinary adventure. It’s then that I find myself fully immersed in the experience, watching our children’s faces light up with excitement and pride as they reel in their catch. The lake becomes the perfect backdrop for these cherished family memories.
With their eyes wide with anticipation, the kids eagerly weigh each fish they catch, boasting about their burgeoning fishing skills and the day’s haul. Their enthusiasm is contagious, and even I can’t help but get caught up in the excitement. These moments are more than just about fishing; they’re about bonding, learning patience, and celebrating small victories together.

There’s something deeply satisfying about cleaning and cooking our catch. This ritual not only honors the effort behind each fish but also connects us to the food we eat meaningfully. Sitting down to eat together, the fruits of our labor presented on the dinner table, we savor each bite, infusing the meal with the joy and pride of the day’s successes.
These meals are more than just nourishment; they celebrate family. Each dish is a reminder of the beautiful day spent by the lake, the laughter, the patience, and the thrill of the catch. In these moments, gathered around the table enjoying the fish we caught, we relive the memories of fishing, reinforcing the bonds that tie us together and the experiences that enrich our lives.
Fishing enthusiasts know the joy of a successful catch and the challenge of preserving its freshness. Freeze drying offers an innovative solution, extending the shelf life of fish while maintaining its taste, texture, and nutritional value.
Through freeze drying, we enhance our pantry with various nutritious, ready-to-eat fish that maintain the nutritional benefits, taste, and texture of the day it was caught. This practice reflects our dedication to sustainable living and self-reliance, minimizing waste while maximizing our fishing adventures. On busy days or during off-seasons when we long for the tranquility of the lake, our stock of freeze dried fish serves as a tangible link to those cherished, sunlit moments spent by the water.
This blog post will guide you through freeze drying fish at home, ensuring you can enjoy the fruits of your fishing labor for months or even years.
Why Freeze Dry Your Catch?

Freeze drying is a superior preservation method for several reasons:
- Long Shelf Life: Properly freeze-dried fish can last up to 25 years without refrigeration.
- Nutrient Preservation: This method retains most of the fish’s nutritional content, including omega-3 fatty acids.
- Flavor and Texture: Freeze dried fish rehydrates to a state very close to its original fresh condition, preserving its flavor and texture.
- Lightweight and Portable: Great for backpacking, camping, or emergency food supplies.
Freeze drying fish at home, particularly with a Harvest Right Home Freeze Dryer, offers unparalleled precision and convenience for preserving your catch. The Harvest Right system has advanced features that allow for precise control over the freeze drying process, ensuring that your fish retains its nutritional value, flavor, and texture.
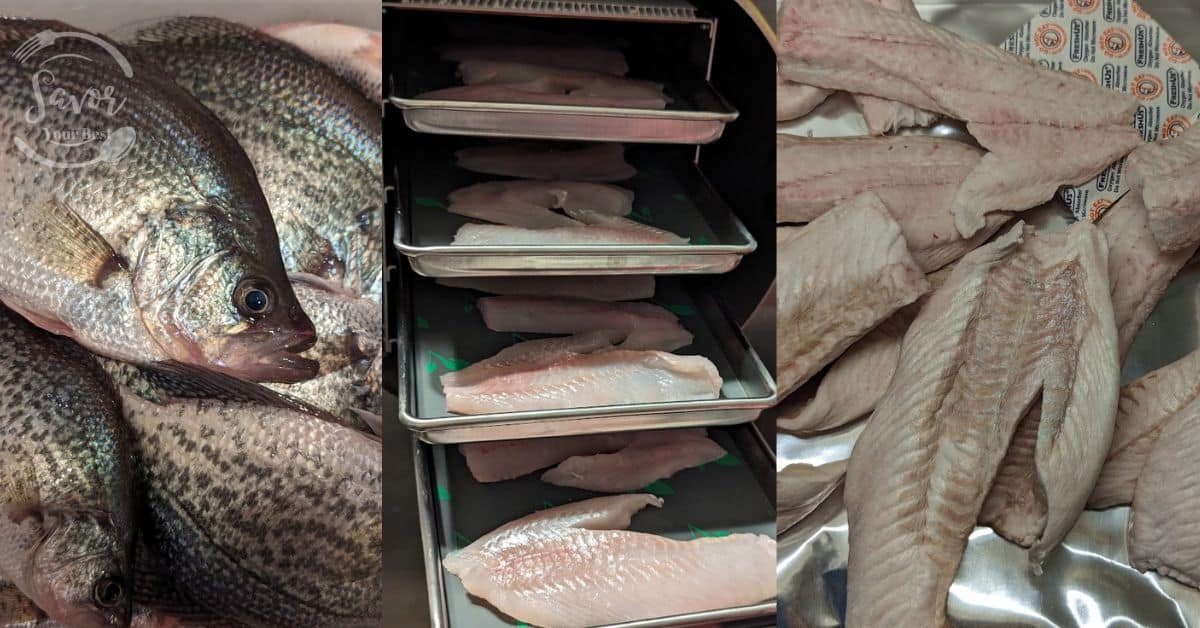
Before starting, it’s essential to prepare your fish by cleaning, filleting, and portioning it into uniform pieces. This facilitates even freeze drying and makes for easier storage and rehydration.
Accessories like the Harvest Right Mylar Bags can further streamline the process, providing durable, airtight storage solutions that protect your freeze dried fish from moisture and oxygen.
With the addition of oxygen absorbers into each Mylar bag, you can significantly extend the shelf life of your freeze dried fish, keeping it fresh for years.
The entire process, from pre-freezing your catch to sealing it in Mylar bags, is designed to be user-friendly, making the Harvest Right Home Freeze Dryer an essential tool for anglers looking to preserve the bounty of their fishing expeditions efficiently and effectively.
Equipment Needed
The primary equipment needed is a home freeze dryer. Brands like Harvest Right offer various sizes suitable for home use. You’ll also need:
- A fillet knife
- Freezer bags, vacuum-seal bags, mylar bags or airtight containers
- Kitchen scales
Preparing Your Catch
- Clean and Fillet: Start by cleaning your fish thoroughly and filleting it. Remove all bones and skin, if preferred.
- Portioning: Cut the fillets into even, smaller portions. This ensures uniform freeze drying and easier rehydration.
- Season the Fillet: enhances your fish’s flavor and makes rehydration and meal prep faster after rehydration.
- Pre-Freezing: Freeze the portions solid. Pre-freezing helps speed up the freeze drying process and preserves the texture.
Filleting is The Best Cut
When preparing fish for freeze drying, the cutting method can significantly impact the quality and ease of the final product. Filleting is widely regarded as the best method for several reasons:
- It creates uniform pieces that freeze dry evenly, ensuring consistent texture and moisture removal.
- Filleting minimizes the presence of bones, which is crucial because bones do not freeze dry well. They can retain moisture, potentially compromising the dryness and shelf stability of the fish.
- Bones can pose a choking hazard or discomfort when rehydrated and consumed.
Other cutting methods, such as slicing into steaks or leaving the fish whole, might be suitable for certain fish or dishes. Still, they generally offer less control over moisture content and are less efficient for freeze drying.
Filleting enhances the freeze drying process and makes the rehydration and subsequent preparation of the fish more straightforward, ensuring a boneless, delicious meal that retains the fish’s original flavor and texture.
How to Fillet Fish
Filleting fish is a skill that improves with practice. Check out this concise step-by-step guide to help you master the basics.

Start with a clean work area and gather your materials.
- A sharp fillet knife
- A cutting board
- Fresh fish
Final Touches
When your finished filleting your fish be sure to check the fillets for any remaining bones and use tweezers to remove them. Rinse the fillets under cold water, pat them dry, and they’re ready to season or freeze dry.
Tips to Fillet Fish
- Keep your knife sharp for cleaner cuts.
- Go slow and steady until you’re comfortable with the process.
- Practice makes perfect, so don’t get discouraged by initial attempts.
Seasoning the Fish
Seasoning fish before freeze drying not only enhances its flavor but also opens up a world of culinary possibilities for when you’re ready to rehydrate and enjoy it. Here are some versatile seasoning ideas that complement various fish types, ensuring delicious outcomes:
Lemon-Herb Seasoning
Combine dried herbs like dill, parsley, and thyme with lemon zest. This blend is perfect for light fish varieties, offering a fresh and aromatic flavor.
Cajun Spice Mix
For a spicy kick, coat your fish with paprika, garlic powder, onion powder, thyme, cayenne pepper, and a touch of oregano. Great for adding some heat to milder fish.
Garlic Butter Rub
Mix softened butter with minced garlic, a squeeze of lemon juice, and chopped parsley. Spread over your fish for a rich and savory profile that freeze-dries well.
Maple-Soy Glaze
Combine equal parts soy sauce and maple syrup with a hint of garlic and ginger for an Asian-inspired sweet and savory flavor. This glaze caramelizes beautifully, adding depth to any fish.
Mediterranean Blend
Mix olive oil with minced garlic, sundried tomatoes, olives, capers, and a dash of oregano for a Mediterranean twist. This seasoning is especially good with firmer fish like salmon or tuna.
Smoky Chipotle Rub
Blend chipotle powder with smoked paprika, garlic powder, onion powder, and a pinch of brown sugar for a smoky, slightly sweet flavor that’s fantastic on robust fish varieties.
Moroccan Charmoula
Create a vibrant paste with cilantro, parsley, garlic, cumin, paprika, and lemon juice. This North African-inspired marinade brings a bold and herby character to the table.
Simple Salt and Pepper
Seasoning fish with just high-quality sea salt and freshly ground black pepper can enhance its natural flavors, making it versatile for any dish.
Teriyaki Marinade
A classic mix of soy sauce, sake (or mirin), and sugar, with a touch of ginger and garlic, offers a sweet and tangy flavor that’s particularly good with salmon or trout.
Italian Pesto Rub
Blend basil, pine nuts, Parmesan cheese, garlic, and olive oil to make a pesto. This rich and nutty rub is excellent for adding a layer of complexity to simple white fish.
Before freeze-drying, ensure the fish is well-coated but not overly wet from the seasoning to optimize the drying process. Experimenting with these seasonings makes your freeze dried fish delicious. It provides various meal options when rehydrated, keeping your diet exciting and flavorful.
Freeze Drying Process

- Loading the Freeze Dryer: Place your pre-frozen fish portions on the freeze dryer trays. Ensure they’re not overlapping for even drying.
- Starting the Cycle: Turn on your freeze dryer and start the cycle. The machine will first create a vacuum, then slowly warm the plates to sublimate the ice directly into vapor, a process that can take 24-48 hours, depending on the thickness of the fish.
- Testing for Dryness: At the end of the cycle, test a piece for dryness. It should be brittle and dry to the touch. If there’s any moisture, continue the drying process.
Packaging and Storage
Storing and packaging freeze dried fish correctly is essential for maintaining its quality and ensuring it remains shelf-stable for the longest possible time. Here are our best practices for storing and packaging freeze dried fish:
Choose the Right Containers

- Airtight Containers: Use vacuum-sealed bags, mylar bags with oxygen absorbers, or airtight containers. These options prevent air, moisture, and light from degrading the fish.
- Oxygen Absorbers: Adding oxygen absorbers to your packaging significantly extends the shelf life by preventing oxidation and the growth of aerobic bacteria.
Check Seals on your Containers
- Check Seals: Regularly check the seals on your bags or containers to ensure they remain intact. Even small leaks can reintroduce moisture and air, compromising the fish’s quality.
Labeling
- Detailed Labels: Clearly label each package with the type of fish, the date of freeze drying, and any seasoning used. This practice helps with rotation and ensures you use the oldest stock first.
- Use Dates: Knowing when you freeze dried your fish helps track its shelf life and ensures you enjoy it at its best quality.
- Include Liquid Amount: For easier rehydration note the amount of water lost on your label. You can calculate this by calculating the difference between the fish’s weight before and after freeze drying. (See Determining the Amount of Liquid section for more info)
Light and Temperature Control
- Cool, Dark Place: Store your packaged freeze dried fish in a cool, dark place, such as a pantry or cupboard, away from direct sunlight. Light and heat can degrade the fish over time, even if it’s well-packaged.
- Stable Temperature: Avoid places with fluctuating temperatures. Consistent, cool temperatures are ideal for long-term storage.
Avoiding Cross-Contamination
- Separate Flavors: If you’ve freeze dried different types of fish or used various seasonings, store them separately to prevent flavors from mingling.
- Sanitation: Ensure your hands and any tools used for packaging are clean and dry to avoid introducing contaminants into the freeze-dried fish.
Regular Checks
- Inspect Packages: Periodically check your stored fish for damage to the packaging, such as holes or tears, and any signs of moisture inside the bags or containers.
- Smell Test: If you suspect any spoilage, a quick smell test of the rehydrated fish can help determine its quality. Discard any fish that smells off or shows visible signs of spoilage.
By following these storage and packaging tips, you can ensure your freeze dried fish remains delicious, nutritious, and safe for years, making it a valuable addition to your long-term pantry staples.
Enjoy Freeze Dried Fish Without Rehydration
Seasoning and cooking your fish before freeze-drying opens up the delightful possibility of creating a high-protein snack akin to fish jerky, yet distinct in its crunchy texture. This innovative approach allows you to enjoy your catch directly from the pantry without the need for rehydration. By marinating the fish in your favorite spices and herbs, then gently cooking it to imbue deep flavors, you transform it into a savory, crunch-filled snack. However, it’s important to select the right type of fish for this method; while heartier fish lend themselves to a pleasantly crisp texture, lighter fish varieties might result in a more delicate, crumbly snack. This careful preparation ensures a delicious, nutritious treat that encapsulates the essence of your fishing adventures, ready to be savored at a moment’s notice.
Rehydrating Freeze Dried Fish
Rehydrating freeze dried fish properly is essential to restore its texture and maximize flavor, making it nearly indistinguishable from fresh fish. Using the weight of the fish can help you determine the right amount of liquid needed for rehydration, ensuring the best possible outcome.
Determining the Amount of Liquid
- Weigh Your Freeze Dried Fish: Before freeze drying, weigh your fresh fish and note this weight. After freeze drying, weigh the fish again. The difference in weight will give you an idea of how much water was lost during the process.
- Calculate Liquid Amount: To rehydrate the fish to its original state, you’ll need to replace the water lost. If your fish weighed 500 grams before freeze drying and now weighs 200 grams, you’ll need approximately 300 grams (or ml) of liquid to rehydrate it.
Choosing Your Rehydration Liquid
The choice of liquid can significantly affect the flavor of the rehydrated fish. Here are some options:
- Water: The most straightforward option, perfect for when you want to preserve the original flavor of the fish. Use warm water to speed up the rehydration process.
- Fish Stock: Using fish stock as your rehydration liquid can enhance the umami and depth of the fish’s flavor, making it ideal for soups, stews, or dishes with richer fish taste.
- Milk: Soaking fish in milk is an age-old technique to tenderize and remove any fishy odor. It’s great for delicate fish varieties, adding a slight richness to the flesh.
- Wine: White wine can add a sophisticated flavor to the fish, suitable for dishes where wine would complement the overall taste profile, such as in sauces or as a poaching liquid for the rehydrated fish.
- Lemon Juice and Water Mixture: A bit of lemon juice mixed with water can brighten the fish’s flavor, adding a subtle zest that works well with lighter fish dishes.
Rehydration Process

- Soak the Fish: Place your freeze dried fish in a bowl and cover it with your chosen liquid. The fish should be fully submerged.
- Let It Rehydrate: Allow the fish to soak. The time needed can vary depending on the fish’s thickness and the liquid’s temperature. Typically, it can take anywhere from 20 minutes to an hour. Warm liquids will rehydrate the fish more quickly than cold ones.
- Check the Texture: After the initial soak, check the fish’s texture. If it feels similar to its pre-freeze dried state, it’s ready. If not, allow it to soak for a more extended period.
- Drain and Pat Dry: Once rehydrated, gently remove the fish from the liquid, drain any excess, and pat it dry with paper towels.
- Final Preparation: Your rehydrated fish is now ready to be cooked or added to your recipe. Treat it as you would fresh fish, keeping in mind it has already absorbed seasoning from the rehydration liquid.
Conclusion
The adventure of fishing with family transcends the act itself, weaving a tapestry of cherished memories enriched by laughter, shared triumphs, and the serene beauty of nature. From the anticipative silence by the lake to the exuberant cheers of a successful catch, the communal preparation, and the satisfaction of enjoying a meal together, each step is a precious chapter in our family’s story.
Integrating the practice of freeze drying the fish we catch adds another layer to our tradition, allowing us to preserve these moments and flavors, ready to be relived and savored even when seasons change or life’s pace quickens, pulling us away from the water’s edge.

This method extends the shelf life of our hard-earned catch. It ensures our pantry is filled with healthy, ready-to-use ingredients that retain the nutritional value, flavor, and texture of freshly caught fish—enabling spontaneous gourmet dinners, quick nutritious meals, and everything in between. It offers the convenience of having a variety of fish at hand, ready to be rehydrated and featured in our favorite dishes, from hearty stews and exotic curries to simple, comforting fish and chips.
Freeze drying fish and adding it to our pantry is more than a method of food preservation; it’s an investment in our family’s tradition of making and sharing meals, a way to keep the spirit of those joyful, lakeside days alive in our kitchen and hearts, regardless of the season or circumstance.
Check out our other guides to fill your pantry with freeze dried staples.We share the best tips to freeze dry Eggs, Milk, Fruit, and Vegetables.
Questions? We Have Answers.
Get answers to a list of the most Frequently Asked Questions.