When Chicken Disappeared
Feeding My Family with Freeze Dried Meat in Times of Shortage
We’re reader-supported. When you buy through links on our site, we may earn an affiliate commission.

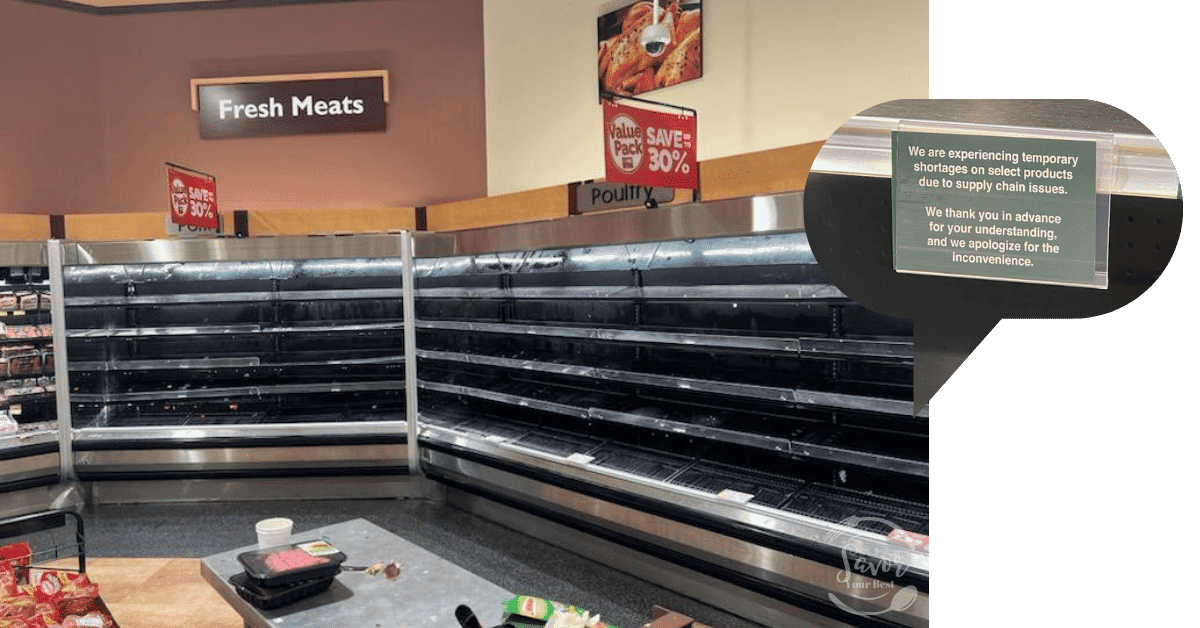
The photo above was what I saw at my local Harris Teeter this week.
The poultry and pork sections, as you can see, were completely bare!
The usual array of fresh chicken, turkey, pork, sausage and other meats had vanished, thanks to supply chain disruptions. While this was disconcerting to see, and it did put a HUGE wrench in my meal plan, I was not worried. Why? Because I have a pantry full of freeze dried meat.

In this post, I will take you through how to freeze dry meat at home and how I rehydrated my freeze dried chicken, so I was able to continue with my meal plan even though I could not buy chicken at the store.
I’m so glad I had freeze dried meat and other essentials at home. While others were facing empty shelves and uncertainty, I had a stash of freeze-dried poultry and ingredients ready to use in various dishes. It’s a comforting feeling to know that you have a reliable source of food in your own home, especially when external circumstances are causing disruptions.
And I want to show you how to do the same.
Preserving Food for Food Security
By preserving food, you’re not just stockpiling for convenience; you’re also creating a valuable safety net against unexpected shortages. In times of crisis or supply chain hiccups, having a pantry full of preserved goods brings peace of mind. It’s a bridge between abundance and scarcity, offering not only sustenance but also a sense of security and self-reliance.
Now, let’s talk timing. The best moment to start preserving food is in a time of abundance. But if you haven’t started yet, don’t fret. You can begin now, food preservation does not have to be daunting and difficult. Start slow, begin with essentials and your favorites. In no time, you’ll be ready when scarcity strikes. It’s an investment in your independence and future food security.
Freeze Drying Food at Home is the Solution
In today’s unpredictable world, the importance of being self-sufficient in terms of food supply cannot be overstated. The global supply chain has its vulnerabilities, as we’ve witnessed in recent times with shortages and disruptions. Freeze drying at home is a powerful solution to combat these supply chain issues and food scarcity.
It allows you to take control of your food inventory, ensuring that you have access to essential ingredients even when they’re hard to come by in stores. By freeze-drying fruits, vegetables, meats, eggs, milk, and many other favorites at home during times of plenty, you can create a robust food reserve that provides peace of mind during leaner times. This practice not only safeguards against unexpected shortages but also promotes a sustainable and self-reliant approach to food security. It’s a simple yet effective way to fortify your household against the uncertainties of the modern world.
How to Freeze Dry Food at Home
Freeze drying food at home is a fascinating process that combines science with practicality. It’s a method of food preservation that removes moisture from food while preserving its nutritional value and flavor. Here’s a simplified overview of how it works:
- Freezing: The process starts by freezing the food. This freezing step is crucial because it locks in the food’s structure and prevents it from collapsing during the drying process.
- Placing in a Freeze Dryer: The frozen food is then placed in a freeze dryer, which is a specialized machine designed for this purpose. Home freeze dryers have become increasingly accessible in recent years. Harvest Right is the most popular brand for home freeze drying machines. Check out our article about Best Freeze Dryers
- Vacuum Chamber: Inside the freeze dryer, the food is subjected to a vacuum chamber. This reduces the air pressure around the food to very low levels, which allows for sublimation to occur.
- Sublimation: Sublimation is the key step in freeze drying. It involves the conversion of ice directly into water vapor without going through the liquid phase. This process removes moisture from the food, leaving it dehydrated but still with its original structure and properties.
- Heating Elements: Some freeze dryers have heating elements that gently warm the food to aid in the sublimation process. This step helps ensure that all the moisture is removed efficiently.
- Collecting Water Vapor: The water vapor created during sublimation is collected and removed from the chamber, leaving the food dry.
- Final Packaging: Once the freeze-drying process is complete, the food is ready to be packaged. Proper packaging is essential to maintain the food’s quality and prevent moisture reabsorption.
Freeze drying at home provides numerous benefits. It extends the shelf life of food significantly, up to 20+ years in some cases. It also retains the food’s original flavor, texture, and nutritional value, making it a healthier option compared to some other preservation methods.
Freeze Drying Meat
By starting with fresh, lean, and well-prepared meat, you’ll set the foundation for successful and flavorful freeze dried meat that can be stored for extended periods, ready to use whenever you need it.
Select High-Quality Meats
Start with fresh, high-quality meat. Lean cuts like chicken breast, beef, or pork loin work well for freeze drying. They contain less fat, which reduces the risk of rancidity during storage. Fat can go bad more quickly than lean muscle tissue, so it’s wise to trim off any visible fat before freeze drying.
Choose meat that is fresh and has not reached its expiration date. Fresher meat will have better flavor and texture once it’s freeze-dried.
Examine the meat for any signs of spoilage, such as an off smell or unusual discoloration. Only use meat that appears healthy and free from any defects.
Preparation
Meat can be freeze dried raw or cooked. I prefer to freeze dry meat cooked.
I begin by Cutting the meat into small, uniform pieces. Smaller pieces freeze-dry more evenly and quickly.
If you plan to freeze dry meat raw, it works best to flash-freeze the meat on a baking sheet after cutting it into pieces. This rapid freezing helps preserve the meat’s cellular structure, ensuring it retains its texture and shape during the freeze drying process.
I prepare the meat in various cooking styles. My favorites include baking, air-frying, sautéing, and grilling. But most of the time, I pressure cook to achieve tender, shredded meat.
Seasoning is optional but can enhance flavor. Marinating the meat before freeze-drying can also add flavor depth. However, be mindful of using marinades with high sugar content, as they can affect the texture of the finished product.
Prep and Load the Freeze Dryer
Set up your home freeze dryer, ensuring it’s clean and functioning correctly. Different freeze dryer models may have slightly different operating instructions, so follow the manufacturer’s guidelines.
Arrange the meat pieces on the trays inside the freeze dryer, taking care not to overcrowd them. Ensure that each piece makes contact with the tray surface to facilitate efficient heating. Leave adequate space between the pieces to allow for adequate airflow. This promotes even and effective freeze drying.
Freeze Drying Process
Start the freeze-drying process. The freeze dryer will gradually lower the temperature inside its chamber while creating a vacuum. This combination allows the frozen water in the meat to sublimate, turning from ice directly into vapor without passing through the liquid phase. This process can take several hours to a day, depending on the amount and thickness of the meat.
During the freeze-drying process, keep an eye on the machine for any potential issues. Check for signs of moisture build-up or uneven drying. You want to address any unusual situation immediately so the meat is not spoiled.
While your machine will indicate when the process is done, it’s essential to double-check to confirm that the food is thoroughly freeze-dried. Completion of the freeze-drying process is evident when the meat is completely dry, without any signs of moisture. The meat will have a lightweight feel and a slightly spongy texture, breaking apart effortlessly.
In case you discover that the process isn’t quite complete, don’t hesitate to add more time as needed. Your attention to detail during the freeze drying process ensures the best results and long-lasting, preserved meat.
Once finished, allow the freeze dried meat to cool to room temperature.

Packaging and Labeling
Proper packaging is essential to maintain the quality of the freeze-dried meat. Use vacuum-sealed bags, mylar bags, or airtight containers to prevent moisture and oxygen from re-entering. Adding an oxygen absorber can help prolong shelf life.
1. Vacuum Sealing: This method involves removing the air from the packaging to create an airtight seal, which prevents moisture and oxygen from deteriorating the quality of the freeze-dried meat. Here’s how to do it:
- Place the Meat in a Vacuum Seal Bag: After freeze drying your meat, arrange it in a vacuum seal bag. Ensure that the bag is large enough to comfortably accommodate the meat without crowding.
- Seal the Bag: Place the open end of the bag into a vacuum sealer machine and initiate the sealing process. The machine will extract the air from the bag and then heat-seal it, creating airtight packaging.
- Label and Store: It’s essential to label your vacuum-sealed bags with the type of meat and the date of preservation. Store them in a cool, dry, and dark place.
2. Mylar Bags: Mylar bags are another excellent option for long-term storage of freeze-dried meat. They provide an additional layer of protection against light and oxygen. Here’s how to use them:

- Place the Meat in a Mylar Bag: Just like with vacuum sealing, you’ll want to put the freeze-dried meat into a mylar bag. Choose an appropriate bag size to prevent overcrowding.
- Seal the Mylar Bag: Mylar bags don’t come with built-in sealing mechanisms, so you’ll need to seal them yourself. This can be done using a household clothing iron or a specialized heat sealer. Make sure to leave a small opening unsealed for the next step.
- Add an Oxygen Absorber: To further extend the shelf life, insert an oxygen absorber into the mylar bag through the unsealed section. These absorbers remove any remaining oxygen in the bag.
- Seal the Remaining Opening: After adding the oxygen absorber, carefully seal the remaining section of the mylar bag. This step is crucial to maintain an airtight environment.
3. Airtight Containers: These containers, typically made of high-quality plastic or glass, offer a reliable option for storing freeze-dried meat. Here’s how to use them:
- Prepare the Meat: Ensure your freeze-dried meat is cool and completely dry after the freeze-drying process. Moisture can compromise the quality during storage.
- Choose the Right Container: Opt for a container that’s appropriately sized for the amount of meat you intend to store. It should have a secure, airtight seal to prevent air and moisture from entering.
- Place the Meat in the Container: Arrange your freeze-dried meat inside the airtight container. Avoid overpacking, as leaving some space helps maintain an ideal storage environment.
- Seal the Container Tightly: Ensure the lid or closure of the container is tightly sealed. This creates an airtight barrier, preventing oxygen and moisture from affecting the meat.
- Label and Store: Label the container with the meat type and date of preservation. Then, store it in a cool, dry, and dark place, away from direct sunlight and temperature fluctuations.
Regardless of which method you choose, vacuum sealing, mylar bags, or airtight containers provide comprehensive protection against environmental factors. The key is to keep your freeze-dried meat shielded from air, moisture, light, and temperature variations, ensuring its long-term quality and flavor.
This step is crucial and can significantly prolong the shelf life of your freeze-dried meat, helping you preserve its quality for years to come.
Just remember to label the container with the meat type and date of preservation. Then, store it in a cool, dry, and dark place, away from direct sunlight and temperature fluctuations to further ensure its longevity.
Rehydrating Freeze Dried Chicken

Rehydrating freeze-dried chicken is a straightforward process that can quickly restore its taste and texture. Here’s a step-by-step guide on how to rehydrate freeze-dried chicken:
What You’ll Need:
- Freeze-dried chicken
- Boiling water
- A bowl or container with a lid
- A measuring cup or scale
Instructions:
- Measure the Chicken: Start by measuring the amount of freeze-dried chicken you want to rehydrate. You can use a measuring cup or a kitchen scale for accuracy.
- Boil and Measure Water: Bring water to a boil. You’ll need approximately 1 1/2 to 2 cups of boiling water for every cup of freeze-dried chicken. If you weigh your freeze dried chicken, you want approximately 150% to 200% water to freeze dried food, depending on how you are planning to prepare your meat once rehydrated. In this example, the weight of the freeze-dried chicken is 5.2 oz. To find the liquid necessary to rehydrate your meal, multiply the weight of your freeze dried food by 150%. 5.2 oz of freeze dried food x 150% = 7.8 oz of liquid.
- Place the Chicken in a Container: Put the freeze-dried chicken into a bowl or container with a lid. Make sure the container is large enough to accommodate the chicken and leave some space for expansion.
- Pour Boiling Water: Carefully pour the boiling water over the freeze-dried chicken in the container. Ensure that all the chicken is submerged.
- Seal the Container: Immediately seal the container with a lid or cover it tightly. This is crucial to trap the steam and heat for efficient rehydration.
- Wait for Rehydration: Allow the chicken to sit undisturbed for about 5 to 10 minutes. This time may vary depending on the thickness of the chicken pieces and the quantity you’re rehydrating.
- Check the Chicken: After the waiting period, open the container and check the chicken’s texture. It should be tender, and fully rehydrated.
- Use or Store: You can now use the rehydrated chicken in your favorite recipes, such as soups, stews, casseroles, or sandwiches. If you have excess rehydrated chicken, store it in an airtight container in the refrigerator and use it within a day or two.
Remember that the exact rehydration time can vary based on factors like the size of the chicken pieces and the specific freeze-dried product you’re using. It’s always a good practice to check for the desired texture before using the rehydrated chicken in your dishes.

Cooking with Rehydrated Freeze Dried Chicken
If you freeze dried raw chicken, be sure to treat it as RAW MEAT after you rehydrate!!!
I like to make soups, stews, and casseroles with freeze dried meat. The rehydration properties of freeze-dried chicken are particularly advantageous when it comes to simmering in broths and sauces. Unlike fresh or frozen chicken, freeze-dried chicken readily soaks up the rich flavors of the surrounding liquids, enhancing the overall taste of your dishes. As it rehydrates, the chicken pieces regain their original texture, becoming tender and succulent, while maintaining their natural meaty flavor. This means that when you incorporate freeze-dried chicken into your soups or stews, it effortlessly absorbs the aromatic seasonings and savory essence of the broth, infusing your meal with a depth of taste that is both delicious and comforting. The result is a hearty and satisfying dish that feels like it’s been simmering for hours, even if you prepared it in a fraction of the time. Freeze-dried chicken’s ability to quickly and effectively absorb flavors and moisture elevates these staple meals to the next level.
This week I had my heart set on preparing Salsa Chicken Cheese Chili. When I went to the store and saw there was absolutely no chicken available, I was so disappointed. Then, I remembered my pantry full of staples, and realized that I had chicken after all!
This recipe is not only quick and easy to prepare but also incredibly flavorful. The rehydrated freeze-dried chicken retains its natural taste and texture, ensuring that every bite is a burst of deliciousness. This salsa chicken cheese chili is sure to be a crowd-pleaser.
Salsa Chicken Cheese Chili with Freeze Dried Chicken

Ingredients:
- 1 cup freeze-dried shredded chicken
- 1 cup chicken broth
- 16 oz salsa (I chose mild)
- 1 ½ cup water
- 14 oz canned corn kernels, drained
- 14 oz canned black beans, drained
- 3 teaspoons taco seasoning
- Salt and pepper to taste
- 4 oz cream cheese, diced in cubes
- 1 cup shredded cheddar cheese (for garnish)
- Fresh cilantro leaves (for garnish)
- Sour cream (optional, for garnish)
- Tortilla chips (optional, for serving)
Instructions:
- Preparation: In a large bowl, combine freeze dried chicken with 1 cup of hot chicken broth. Cover and let sit for 10 minutes.
- Add corn kernels, black beans, and salsa to the rehydrated shredded chicken.
- Cooking: Transfer mixture to a large pot over medium heat. (I used the sear/ sautee function on my Instant Pot) Stir taco seasoning, salt, and pepper. Bring the mixture to a gentle boil, then reduce the heat to low. Simmer uncovered for 15-20 minutes, allowing the flavors to meld together and the chili to thicken.
- Stir in cream cheese, and allow to continue simmering until fully combined about 10 minutes.
- Serve: Ladle the hot salsa chicken cheese chili into bowls. Top each serving with a generous sprinkle of shredded cheddar cheese. Garnish with fresh cilantro leaves and, if desired, a dollop of sour cream. I like to add some sriracha or jalapenos to add some heat. Serve with tortilla chips for some satisfying crunch.
- Enjoy: Dive into your delicious and hearty salsa chicken cheese chili. The blend of zesty salsa, tender chicken, and savory spices creates a mouthwatering chili that’s perfect for weeknight meals.