Nothing says fall like the rich, warm flavor of pumpkin in your favorite recipes. From pumpkin pie to comforting soups, homemade pumpkin puree is a versatile ingredient that can elevate any dish. And if you want to enjoy pumpkin goodness all year round without the additives found in canned options, using freeze dried raw pumpkin is a game-changer. In this post, we’ll guide you through how to make pumpkin puree from freeze dried pumpkin, and why it’s the ultimate health and wellness hack.
The Health Benefits of Making Your Own Pumpkin Puree
Homemade pumpkin puree is a much healthier option than store-bought versions, which can contain additives, preservatives, and unnecessary sugars or salts. Learning how to make pumpkin puree from freeze dried pumpkin ensures you always have this fresh, nutritious option ready. When you make it yourself, you control every aspect of the process, ensuring you get 100% pure pumpkin.
Pumpkins are packed with vitamin A, fiber, antioxidants, and beta-carotene, which support eye health, boost immunity, and aid in digestion. By using fresh, whole pumpkins, you’re also minimizing your exposure to BPA and its substitutes, which is often found in the lining of canned goods. So, you’re not just making delicious pumpkin puree – you’re making a healthier choice for you and your family.
The Freeze Drying Advantage: Convenience and Time Saving
Preparing pumpkin from scratch for recipes can be quite time-consuming, which is why many of us reach for processed substitutes to save time. However, these store-bought options often contain chemicals and additives, and they lose much of their nutritional value. By freeze drying your own pumpkin at home, you only need to go through the preparation process once. This allows you to have a clean, preservative-free, and nutrient-rich supply of pumpkin on hand, ready to use in any recipe without the hassle of repeated prep work.
Freeze drying raw pumpkin chunks is a massive time-saver. Once you have a stash of freeze dried pumpkin in your pantry, you can whip up pumpkin puree in minutes without having to roast, peel, or slice a fresh pumpkin every time. It’s perfect for those busy weekdays when you crave a quick pumpkin-inspired dish or when you want to add a healthy boost to your meals. This shortcut allows you to indulge in your favorite fall flavors anytime you want.
Raw vs. Cooked: The Best Way to Freeze Dry Pumpkin
While you ca prepare cooked pumpkin puree first and then freeze dry it, this limits the versatility of your freeze dried pumpkin supply. By freeze drying raw pumpkin chunks, you retain the option to rehydrate them for multiple uses – from dicing them into soups or stews to blending them into smoothies. This way, you have an ingredient that adapts to your needs and can be transformed into puree whenever you want.
Additionally, freeze drying the raw pumpkin helps retain more of the original nutrients since you are not loosing nutrients in the cooking process before freeze drying. This ensures you get all the vitamins and minerals that pumpkins offer. It’s like having fresh pumpkins on hand all year without the worry of spoilage!
How to Prepare and Freeze Dry Pumpkin
Take a look at our full pumpkin freeze drying tutorial, but here’s a quick summary:
Choosing the Right Pumpkin
To make the best puree, start with the right pumpkin. For cooking, you want to use sugar pumpkins or pie pumpkins, which are smaller, sweeter, and less watery than the large carving pumpkins you see around Halloween. Their flesh is denser, making them perfect for creating a creamy puree. A medium-sized sugar pumpkin, weighing about 3-5 pounds, is ideal and will yield enough pumpkin to create several batches of puree.
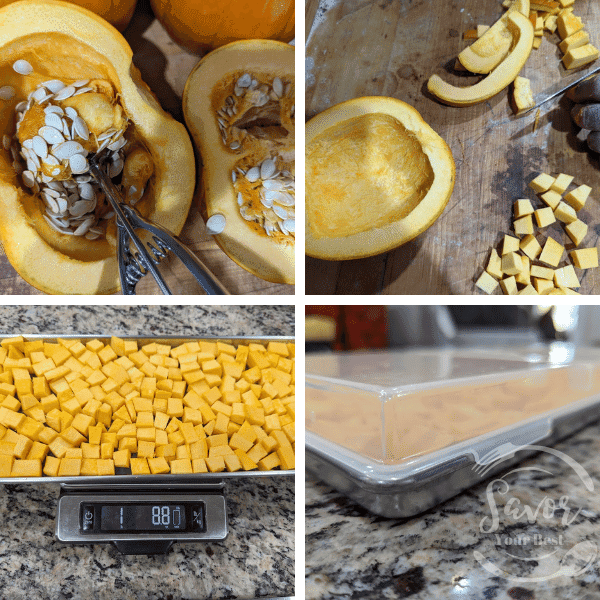
- Clean and Cut: Wash your pumpkin thoroughly, then cut it in half and scoop out the seeds and stringy bits. Save those seeds for roasting if you want a healthy snack!
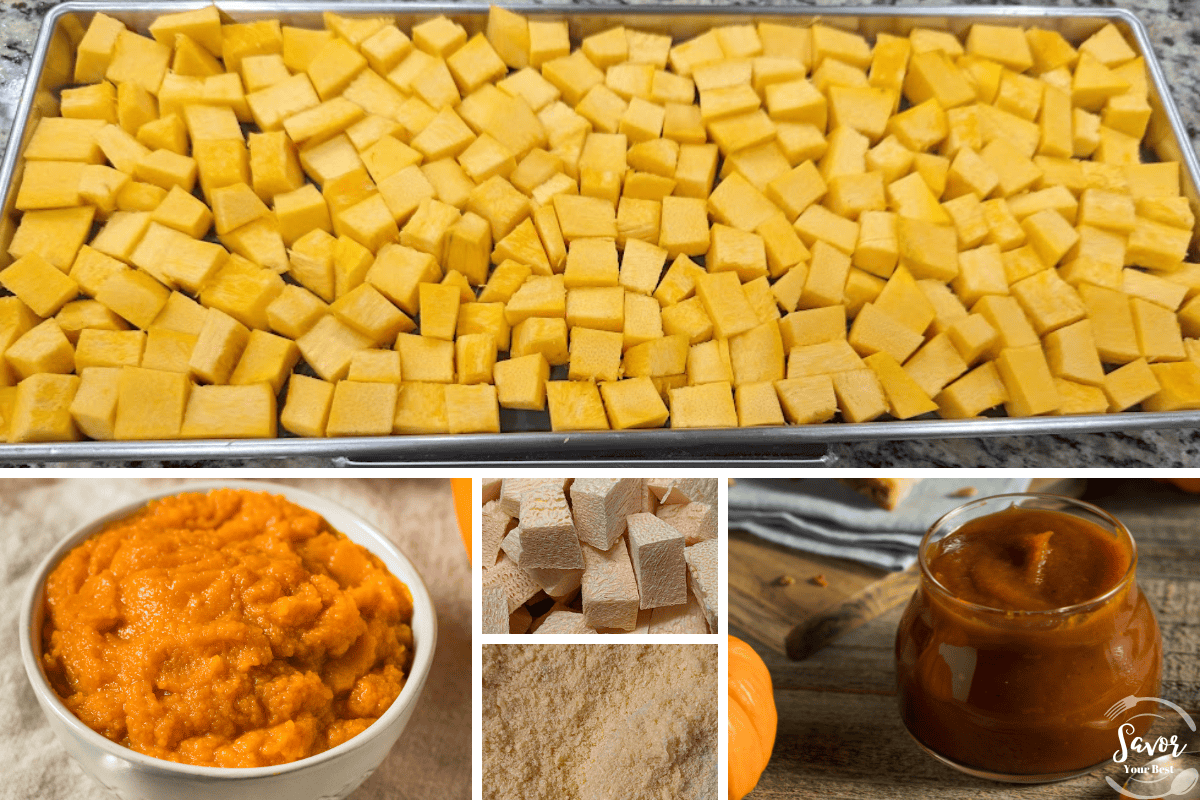
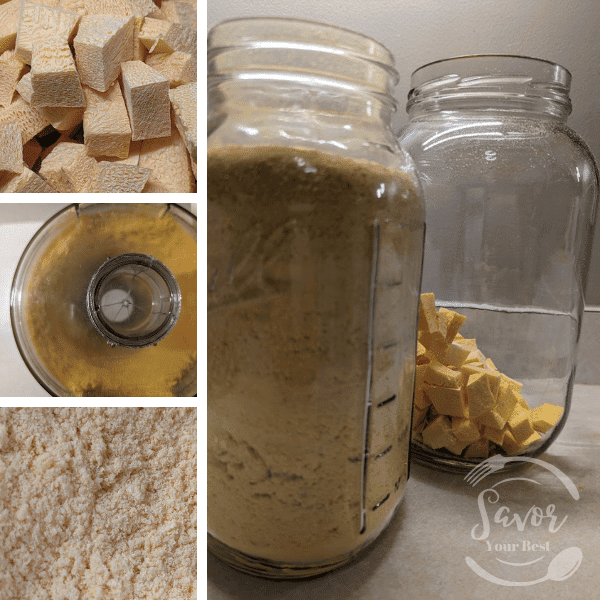
- Peel and Slice: Peel the pumpkin skin off with a vegetable peeler, then slice the pumpkin flesh into 1-inch chunks. The smaller the pieces, the faster and more evenly they’ll freeze dry.
- Freeze Dry: Spread the raw pumpkin chunks evenly on the trays of your freeze dryer. A Harvest Right freeze dryer works perfectly for this process, and the freeze drying cycle usually takes 24-36 hours. Once done, your pumpkin pieces will be light, crisp, and ready for storage.
Once you’ve freeze dried your raw pumpkin pieces, you can leave in chunks or powder depending on how you intend to use the pumpkin. Store them in Mylar bags with oxygen absorbers for long-term use or in airtight containers such as ball jars with oxygen absorbers for shorter-term use. This way, you’ll have a stash of high-quality, nutrient-rich pumpkin on hand throughout the year. No more rushing to the store or settling for canned alternatives!
How to Rehydrate Raw Freeze Dried Pumpkin – Step-by-Step
- Measure Your Pumpkin: Start by measuring the amount of freeze-dried pumpkin you need. Remember that freeze-dried pumpkin will expand when rehydrated, so if your recipe calls for 1 cup of fresh pumpkin, use about 1/2 cup of freeze-dried pumpkin.
- Place in a Bowl: Put the freeze-dried pumpkin pieces into a bowl large enough to hold both the pumpkin and water.
- Add Water: Slowly pour warm (but not hot) water over the freeze-dried pumpkin pieces until they’re just covered. You’ll need about 2 parts water to 1 part freeze-dried pumpkin.
- Let It Sit: Allow the pumpkin to soak for about 10-15 minutes. Stir occasionally to ensure all pieces are evenly absorbing water.
- Check Texture: After 10-15 minutes, check the texture. If it feels soft and similar to raw pumpkin, it’s ready to use. If it’s still firm, let it soak a bit longer, adding more water if needed.
- Drain Excess Water: Once the pumpkin is rehydrated, drain any excess water. Your pumpkin is now ready to be used as you would fresh pumpkin in any recipe!
Homemade Pumpkin Puree
Ingredients:
- 2 cups rehydrated freeze-dried pumpkin
- 1/2 cup water (adjust as needed)
Instructions:
- Rehydrate Pumpkin: Start by rehydrating the freeze dried pumpkin pieces following the steps outlined in the rehydration guide above.
- Cook the Rehydrated Pumpkin: Roasting Method:
- Preheat your oven to 400°F (200°C).
- Roast the pumpkin for about 20-25 minutes or until it becomes tender and starts to caramelize around the edges. Turn halfway through for even cooking.
- Place the rehydrated pumpkin pieces into the Instant Pot.
- Add 1/2 cup of water.
- Secure the lid and set the valve to the sealing position.
- Select the “Manual” or “Pressure Cook” setting and cook for 5 minutes on high pressure.
- Allow a 5-minute natural release, then carefully perform a quick release for any remaining pressure.
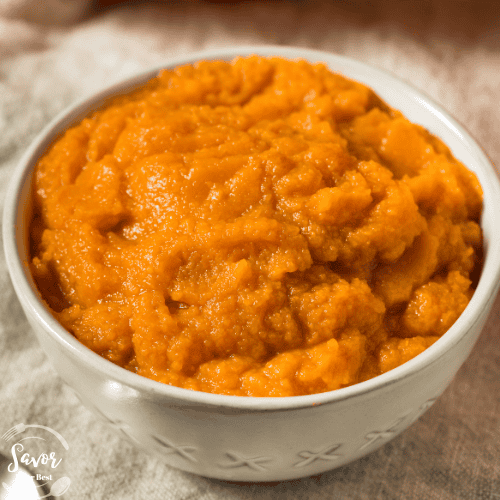
- Blend the Pumpkin: Once the pumpkin is cooked and tender, let it cool slightly. Transfer the cooked pumpkin to a blender or food processor, adding a bit of water if needed. Blend until smooth and creamy.
- Adjust Consistency: If your puree is too thick, add a bit more water, a tablespoon at a time, until you reach your desired consistency.
- Use or Store: Use your homemade pumpkin puree immediately or store it in an airtight container in the refrigerator for up to a week. You can also freeze it for up to 3 months or even freeze dry the puree for long-term storage.
Kate’s Pro Tip: If you prefer to have pumpkin puree ready for any recipe, freeze it in ice cube trays first or put it in molds, then freeze dry it. This way, you’ll have convenient, pre-portioned servings that are easy to use without any waste.
Ways to Use Your Homemade Pumpkin Puree
Having freeze dried raw pumpkin on hand means you’re ready to make fresh puree anytime and dive into any pumpkin recipe that comes your way. Now that you know how to make pumpkin puree from freeze dried pumpkin, you can use it in pies, soups, and smoothies anytime. Here are some ideas to get you started:
- Pumpkin Soup: Stir in your freshly made puree to create a creamy, hearty soup.
- Pumpkin Smoothies: Add a spoonful of pumpkin puree to your morning smoothie for a nutrient-packed start to your day.
- Pumpkin Pancakes or Waffles: Mix the puree into your batter to create fluffy, fall-inspired pancakes or waffles. The pumpkin adds moisture and a subtle sweetness, making your breakfast both delicious and nutritious.
- Pumpkin Oatmeal: Stir a dollop of pumpkin puree into your morning oatmeal, along with a sprinkle of cinnamon and nutmeg, for a cozy, autumn-flavored start to the day.
- Pumpkin Pasta Sauce: Blend your puree with a bit of cream, garlic, and Parmesan cheese to create a unique, creamy pasta sauce that’s rich in flavor and nutrients.
Bonus: How to Make Pumpkin Butter with Your Pumpkin Puree
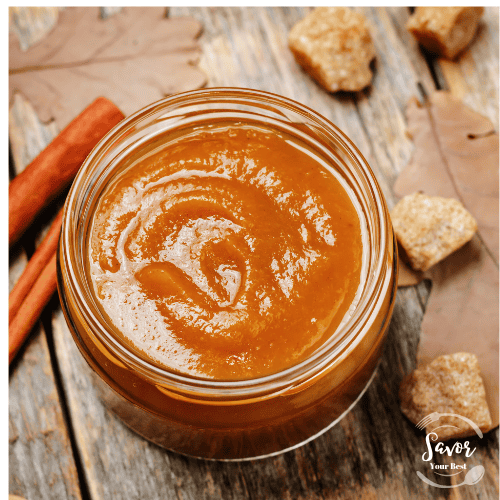
If you’re looking to elevate your fall spread, try making pumpkin butter! Simply mix your pumpkin puree that you made with freeze dried pumpkin with a bit of apple cider, maple syrup, cinnamon, nutmeg, and ginger. Cook it down over medium heat until it thickens into a spreadable consistency. It’s perfect on toast, pancakes, or stirred into yogurt!
Homemade Pumpkin Butter Recipe
Ingredients:
- 2 cups pumpkin puree (from your freeze dried pumpkin)
- 1/2 cup apple juice or apple cider
- 1/2 cup brown sugar (adjust to taste)
- 1 tsp ground cinnamon
- 1/2 tsp ground ginger
- 1/4 tsp ground nutmeg
- 1/4 tsp ground cloves
- 1/4 tsp ground allspice
- A pinch of salt
- 1 tsp vanilla extract
Instructions:
- Combine Ingredients: In a medium saucepan, combine the rehydrated pumpkin puree, apple juice/cider, brown sugar, cinnamon, ginger, nutmeg, cloves, allspice, and salt. Mix well until all ingredients are fully incorporated.
- Cook the Mixture: Place the saucepan over medium heat and bring the mixture to a gentle boil. Reduce the heat to low and let it simmer, stirring frequently, for about 20-30 minutes. The pumpkin butter should thicken and develop a rich, spreadable consistency.
- Add Vanilla: Once the mixture has reached your desired thickness, stir in the vanilla extract and cook for an additional 2-3 minutes.
- Cool and Store: Remove from heat and let it cool completely. Transfer the pumpkin butter to airtight jars or containers.
- Enjoy: Your homemade pumpkin butter is ready! Store it in the refrigerator for up to 2 weeks or freeze dry it for long-term storage.
Tips:
- Use the pumpkin butter as a spread on toast, mix it into yogurt, swirl it into oatmeal, or use it as a filling for pastries.
- Adjust the sweetness and spices to your preference!
Get the Most Out of Fall’s Harvest
By freeze drying pumpkin, you’re making the most out of fall’s harvest. It’s a sustainable way to ensure you’re not wasting any of this nutritious vegetable. With your Harvest Right freeze dryer, you can stock up when pumpkins are in season and at their peak, then enjoy them whenever you want throughout the year. Plus, with freeze dried raw pumpkin on hand, you can whip up a batch of puree in minutes – perfect for busy weeknights or when the craving for a pumpkin recipe strikes.
Make Your Own Pumpkin Puree with Freeze Dried Pumpkin
Making your own pumpkin puree from freeze dried pumpkin is a healthy, cost-effective, and convenient option that ensures you always have high-quality pumpkin on hand. It’s free from additives, preservatives, and unnecessary sugars, giving you the purest, most delicious pumpkin flavor for all your baking and cooking needs.
So, this fall, embrace the season by freeze drying your pumpkins and create a pantry staple that you can use year-round. With a Harvest Right Freeze Dryer, you’re not just preserving fruit (yes! a fruit) – you’re preserving the taste, nutrition, and joy of fall in every meal.